Posts tagged ‘machine quilting’
Little Happy Dances!
Wow, it feels great to get things finished! Even though none of these projects were on my “official” list of UFOs, they were still taking up both physical and psychological space, and it’s wonderful to have them out from underfoot, so to speak. Plus, as I wait for labor to start, finishing quilt projects is apparently as close to “nesting” as I get.
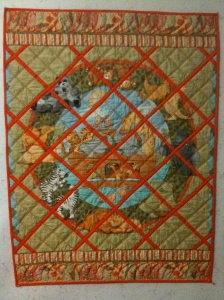
Noah’s Ark panel:
 I picked up Mary Mashuta‘s “Foolproof Machine Quilting” for $10 on sale at Quilt Beginnings in Columbus, OH on our way out to Indianapolis in August. I have long been a fan of hers, first upon seeing her gorgeous quilts and wonderfully inspiring books (her book, “Confetti Quilts” would be on my desert island list) and second upon learning that she manages to amicably share a sewing space with her twin sister, Roberta Horton. However, for all that this book contained some great ideas, it was mostly centered around making walking foot quilting accessible to new quilters who’d been put off by free motion. Since that’s not where I am at this stage, I passed the book along to a friend.
But one of the ideas she’d stressed was using heavy threads and decorative stitches to make quilting show up on busy prints (for which she and I share a passion.) I didn’t want to do very intricate quilting on this piece, first of all because it’s just a panel that I tweaked by piecing in the lattice, but also because I didn’t want to detract from the graphic impact of the panel. The viewer’s brain already has to make the visual “jumps” across the lattice; I didn’t want to further confuse things by introducing a busy quilting design. So I marked a simple 2″ grid to echo, rather than compete with, the lattice, then used the walking foot with a serpentine stitch and orange Brytes by Superior Threads, a nice heavy 30/3 polyester with a bit of a sheen to it. I used the Pellon Legacy wool batting I’d bought at AQS Lancaster, which gave it a nice puffy loft. (I hesitate to say it, but I think I might actually prefer the Pellon to the Quilter’s Dream wool I used for Convergence Birds and have set aside for Ruby Wedding!)
I switched to my fancy new free motion foot, its first real test drive since I bought it at Quilt Odyssey, but left the Brytes in to do a no-mark, freehand Patsy Thompson-style feather in the top and bottom borders. I’ve been a huge fan of her Freemotion Fun with Feathers DVD series, but hadn’t had much opportunity to use her techniques in actual quilts rather than just on doodle cloths, and I’m very pleased with how it turned out. I quilted these feathers before I took her class at Quilting with Machines in September, and it acted as an excellent warmup. I wasn’t sure whether the feathers would show up in that busy print border, but apparently the combination of the puffy wool batting and the thick thread did the trick. I will have to remember that.
For the binding, I used the same fabric I’d used for the lattice strips, and Suzanne Michelle Hyland’s Sew Fast, Sew Precise Machine Binding technique that was so maligned by the show judges on my quilts this spring and summer — remember, “a hand-sewn binding adds refinement” — but that gets my quilts finished rather than languishing in limbo. Plus, I don’t think my baby boy will be so discriminating.
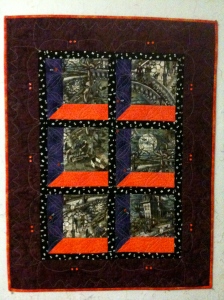
Mom’s Halloween Attic Windows:
 I had three big decisions to make when quilting this little quilt:
1) How to handle the border, which is decently wide and of a solid batik that would nicely show off the quilting
2) How to quilt the focus fabric squares without distracting from the fabric itself
3) How to use the glow-in-the-dark thread to best advantage.
It’s always tricky to quilt something for someone else. Even considering that my “client” in this case is my mother, whose tastes I have far more experience with and insight into than the average person’s, there’s still that worry that what pleases me might not please her. I know she doesn’t like extremely dense quilting, especially in contrasting threads. At the same time, I have this wonderful opportunity to use glow-in-the-dark thread on a Halloween quilt, and the NiteLite colors are all very light; I used the Purple, but against the deep plum border even it looks almost white. I used the Pellon Legacy soy blend batting, which only needs to be quilted every 8″, so dense quilting wouldn’t be necessary. I started with simple ditch quilting with the walking foot and fine, matching threads to anchor the center. That way, I could come back to the center once I’d figured out what to do with it.
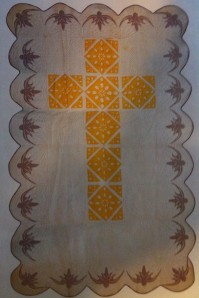
I knew I wanted to do something spectacular in that border, yet that would still fit the whimsical theme of the piece. That was when I remembered the antique Easter quilt I’d seen in Fons & Porter, with an appliqued border of stylized bats that just looked like fancy swags at first glance:

"Easter Quilt," by Bertha Amelia Meckstroth, 1933 (from Fons & Porter's Love of Quilting Magazine, July/August 2010)
That idea was way too much fun to leave alone, so I modified a simple bat design from an online coloring page (great resources for simple shapes and line drawings!), sized it to fit, and then used another technique from Mary Mashuta’s book to mark them: I cut them out of freezer paper and ironed them onto the quilt top, then did my freemotion quilting just outside the edge of the paper. This also allowed me to fudge the measurements where I needed to, and obviated the need to do a lot of marking on a dark fabric. I hadn’t originally intended to add the button eyes, but I wanted to make the shapes more clearly recognizable as individual bats, and especially with the “spooky eyes” fabric as the sashing, I think it maintained the mood.
I wish I could post a picture of what it looks like glowing in the dark, but I do not have the right camera equipment for that. In fact, I have a phone, which is not going to cut it. But let me assure you, it’s pretty impressive. So I decided to just use the NiteLite for all the visible quilting, even though it’s higher contrast than I would have otherwise dared. That also solved my dilemma for the Attic Windows sashing, as I didn’t really want to have to change threads between the purple and orange segments. I chose the design partly as a quilting pun: it’s a variation on the old Pumpkin Seed design, which I thought was both thematic and pretty. Add some diagonal lines to tame the focus fabric, and it’s done! This also got the machine binding treatment: it’s a wallhanging, for goodness sakes! I did hand sew the hanging sleeve, though. Isn’t that batik adorable?
Matt and Alyssa’s quilt gets its own happy dance post, after all the trials and tribulations of what was supposed to be a simple project. So here’s my preliminary happy dance for the two smaller projects, and I’ll indulge in a grander one in the next post:


