Posts tagged ‘notions’
I Got An AccuQuilt GO! Cutter!
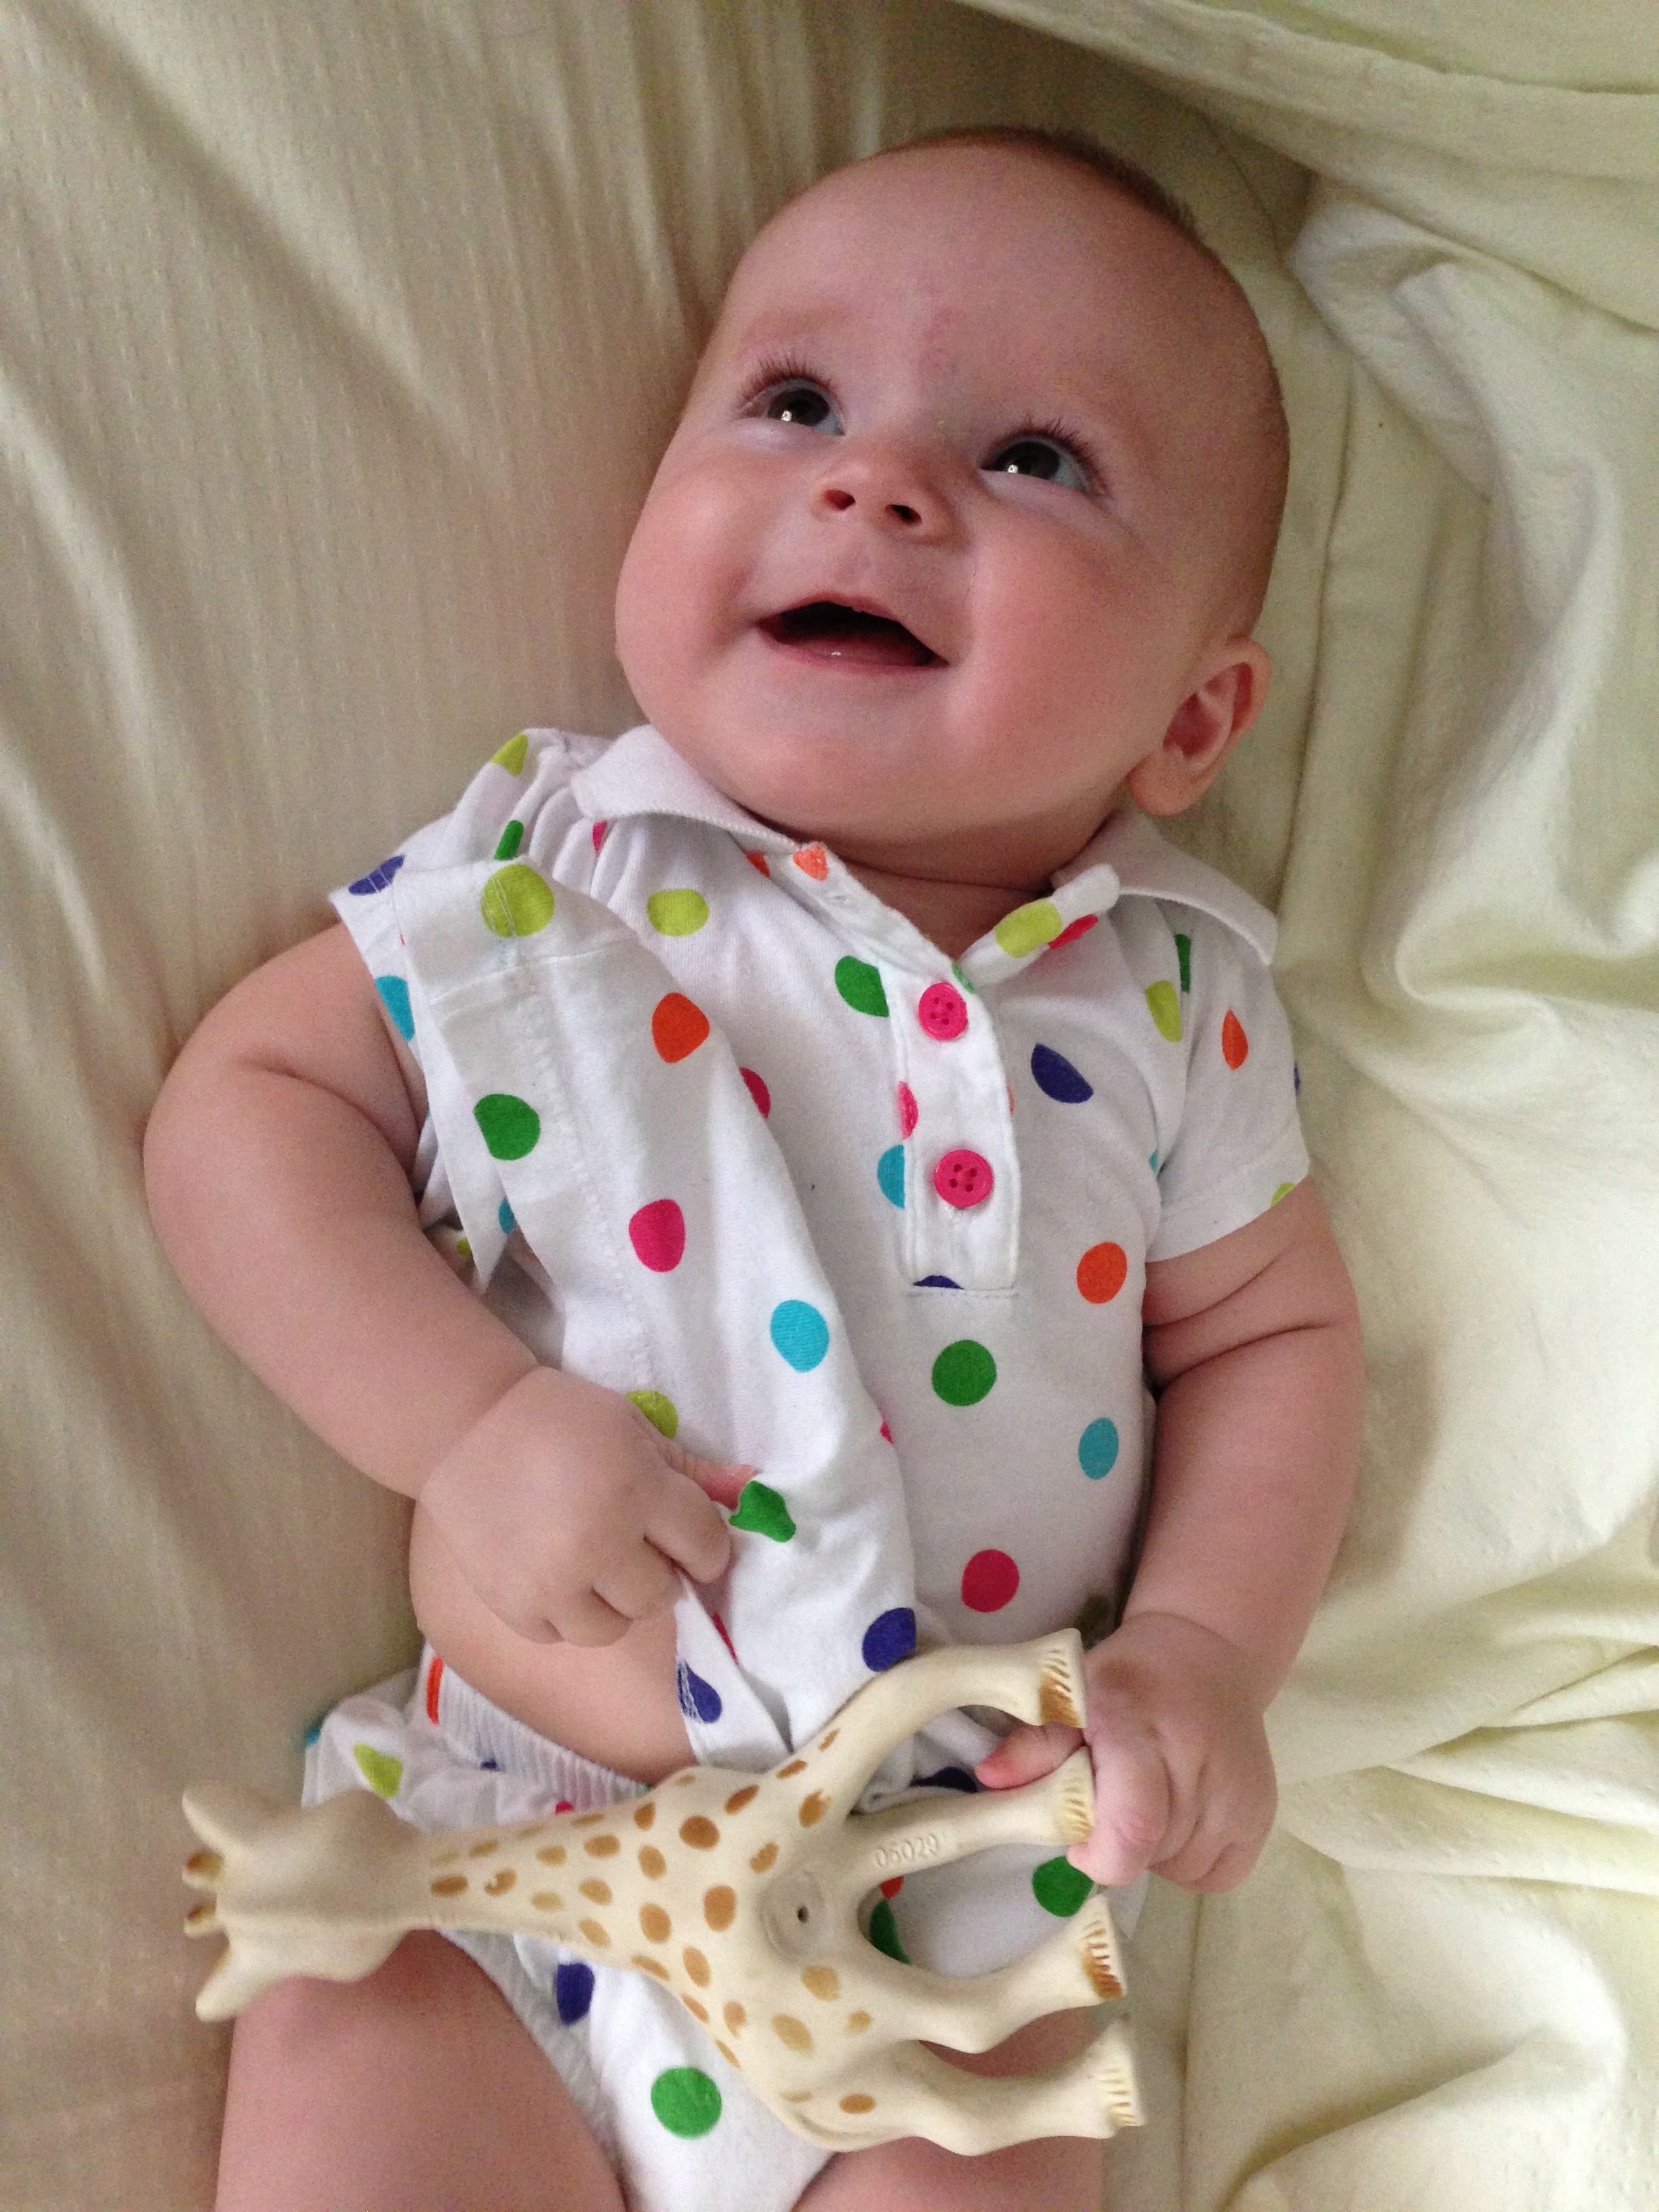 And just like Finley here, I’m so excited about my toy!
I had heard a lot about the GO! cutter when it first came out, because Alex Anderson and Ricky Tims are spokespeople for it, with promotional videos on The Quilt Show site. While I’ve long been intrigued by fabric die cutters, ever since first visiting the fabulous home quilting studio of a guild friend who has the Accuquilt Studio cutter, I didn’t really think of it as being a priority item for me. I thought maybe it might be worthwhile for someone who does an awful lot of applique, but I don’t, and on the odd occasion when I do, I tend to design my own. So while I was glad to know there were die cutters in the world, I didn’t really covet one.
 Until… I had stopped by The Finishing Stitch on my way home from a wedding the day before Mother’s Day, and they had a Studio cutter and dies for sale for $600, listed as a $1500 value. A discount that steep is always going to pique my interest, but Finley was getting fussy so I didn’t investigate in depth. However, I started thinking about it more on the way home, and therefore spent some time on the Accuquilt website over the rest of the weekend. The main thing that I learned was how many piecing dies are available. As I am primarily a piecer, and cutting fabric has always struck me as tedious, this was very intriguing. Although a separate die is necessary for each different size or shape, I certainly tend to use certain shapes and sizes repeatedly in my projects (2″ finished half-square triangles certainly spring to mind.) And the idea, reiterated over and over on the website, that die cutting is “up to 90% faster than rotary cutting,” was extremely attractive to a full-time-working mom of two children under 3.
After all, although I know it’s an all-too-temporary stage, I don’t have a whole lot of free time to quilt right now. It’s a trade-off I’m more than happy to make to be involved in Ronan’s and Finley’s young childhood, but I don’t want to completely swear off quilting right now. (And several of the quilts I’ve made in the last few years have been for them, and they enjoy using them!) So anything that speeds the process without decreasing my artistic freedom or my enjoyment of the process is a good thing. I have no interest in using pre-cut kits because my favorite part of quilting is selecting the fabrics, but if I can choose my own fabric and then fast forward to the construction stage without spending such a long time cutting the fabric into pieceable shapes, I will get a lot more done. Additionally, I haven’t wanted to do much cutting when Ronan is awake, because I have an absolute paranoia that he could get hold of the rotary cutter. While there are still blades in the die boards, he would have to do handstands on them in order to hurt himself with them.
 So Monday morning, I called Jean… and she told me that she was sorry, she should have taken the signs down, because she was selling the Studio cutter to the new owner of the shop as part of the shop sale. Having just spent the last 36 hours convincing myself that I desperately wanted this thing, it was definitely a letdown. But like Aesop’s fox with the grapes, I quickly recovered by realizing that the Studio would not have been the right choice for me. While it can cut more layers at once, and the dies are more numerous, varied, and larger, the dies are more expensive and the cutter requires a dedicated space, as it is heavy and does not fold up. It really seems like the good folks at Accuquilt really thought about all the factors that prevent quilters from buying a Studio cutter, and designed the GO! to meet those needs. I took my time researching the products and prices (another GO! advantage, as the Studio and its dies are only available through Accuquilt), then finally pulled the trigger in mid-July.
 My GO! came in the mail July 23, the Tuesday before my mini-retreat at my house with Rhonda and Diane. I bought it from quilting-warehouse.com which offers significant discounts (30-50%) on the GO! and several selected dies, and although the shipping was expensive and the order took longer than their stated estimate to process, I cannot complain in light of the overall value. I got the 12″ block “mix and match” bundle, which is a collection of eight dies for shapes commonly found in 12″ pieced blocks. I also got some extra cutting mats, the 8.5″ rag square, which precuts the fringes for rag quilts (more on that later), the Funky Flower applique shape, and the 3.5″ mini tumbler, since I’m getting a new niece and a new nephew this fall who will each be in need of a baby quilt. With shipping, this all came to less than $450; accuquilt.com lists the cutter with the 12″ bundle alone at $581.90.
 I spent all my work time at the retreat cutting: I cut almost all the pieces for the 2011 Shop Hop blocks; cut down several pairs of Dan’s old worn-out jeans to make a denim rag quilt; and cut 17.5 yards of solids into triangles for the guild challenge this winter. Although I didn’t get to work uninterrupted (see above re: two children under 3), I estimate that it took me less than 3 hours to cut all that solid fabric, so I stand convinced.

This happened within minutes of taking the picture above. Technology may change, but some other things never do.
I’ve only started piecing the shapes I cut, so I can’t say anything definitive, but so far the accuracy seems excellent. There’s definitely a learning curve to using the cutter, but I’ve caught on quickly. And if using it means I get to spend more of my admittedly limited time on the parts of quilting I enjoy more than cutting fabric, I’m all for it.
Next up, a project I’ve already started and completed with my GO!
FINISHED!!! Finley’s Quilt

Finley on her quilt, Nixon Park, 6/22/13
I managed to finish Finley’s quilt before she was four months old!

Finley’s Quilt, 2013, 53″ x 53″
I can technically claim I started this quilt while in the process of giving birth to her. When I was in a holding pattern at Labor and Delivery, hooked up to the monitors with my IV started, I found myself all worked up with nothing to do. I had filled out all the forms they had given me; I had handed off my phone to Dan so it wouldn’t go missing (no pockets in a hospital gown, go figure); and I had no one to talk to, because Dan and my parents were working out the logistics of who would be with Ronan at various points throughout the day’s events. So, to keep myself amused and centered, I started to do math longhand.
 I had seen this Rolling Stone quilt (Emeralds, by Mary Fons) on the cover of Fons and Porter’s Love of Quilting magazine, and thought it would be perfect. I wanted to use stash fabric, and I didn’t have an appropriate focus print handy like I had for Ronan’s quilt. However, I didn’t want to make it exactly as written, because as I’ve stated previously, I try to avoid the “corner cutter” methods when possible; I find them to be wasteful of fabric, and I’m an accurate enough piecer for my purposes that I don’t need to avoid cutting triangles. So I did my calculations for the pieces I would need to cut, and kept my mind largely occupied until they were ready to wheel me to the operating room.
 Needless to say, I didn’t start to actually cut and piece the quilt until Finley was a few weeks old. Since I was making thirteen blocks, I pulled twenty-six pink and purple fabrics from my stash and cut 2 rectangles and 2 square-in-a-square pieces from each. Then from half of them, I cut an additional square for the block centers. I cut the background triangles and rectangles from eight light taupe fabrics, and then pieced everything together into component units. I didn’t plan the individual blocks until I had already pieced all the square-in-a-square units and rectangle squares, so when I laid out the blocks (my favorite part!) I couldn’t always achieve my goal of keeping similar fabrics as far apart from one another as possible. Still, most of the blocks avoid repeating fabrics.

That’s not it…
Originally, I had imagined using another light taupe for the setting triangles, but when I actually tried it on the design wall, it really washed out the blocks. From there I tried a taupe and wasabi green floral on a light background, and if anything, that was worse. But that inspired me to try a very odd fabric that I’d bought some time ago to coordinate with some of my dark taupes that had wasabi green highlights. It’s from the Odyssea collection by Moda, and as soon as I put it up on the design wall with the blocks I knew I had a winner.

That’s it!
The only downside was that I didn’t have enough for the corner triangles. However, even that became an opportunity because it gave me a place for applique. This was the only new fabric I bought for this quilt, as I didn’t have a tone-on-tone or solid in the same green. Searching for that was the impetus behind Finley’s and my first Mommy-daughter trip to the fabric store.

She was great until I got to the cutting table, then melted down.
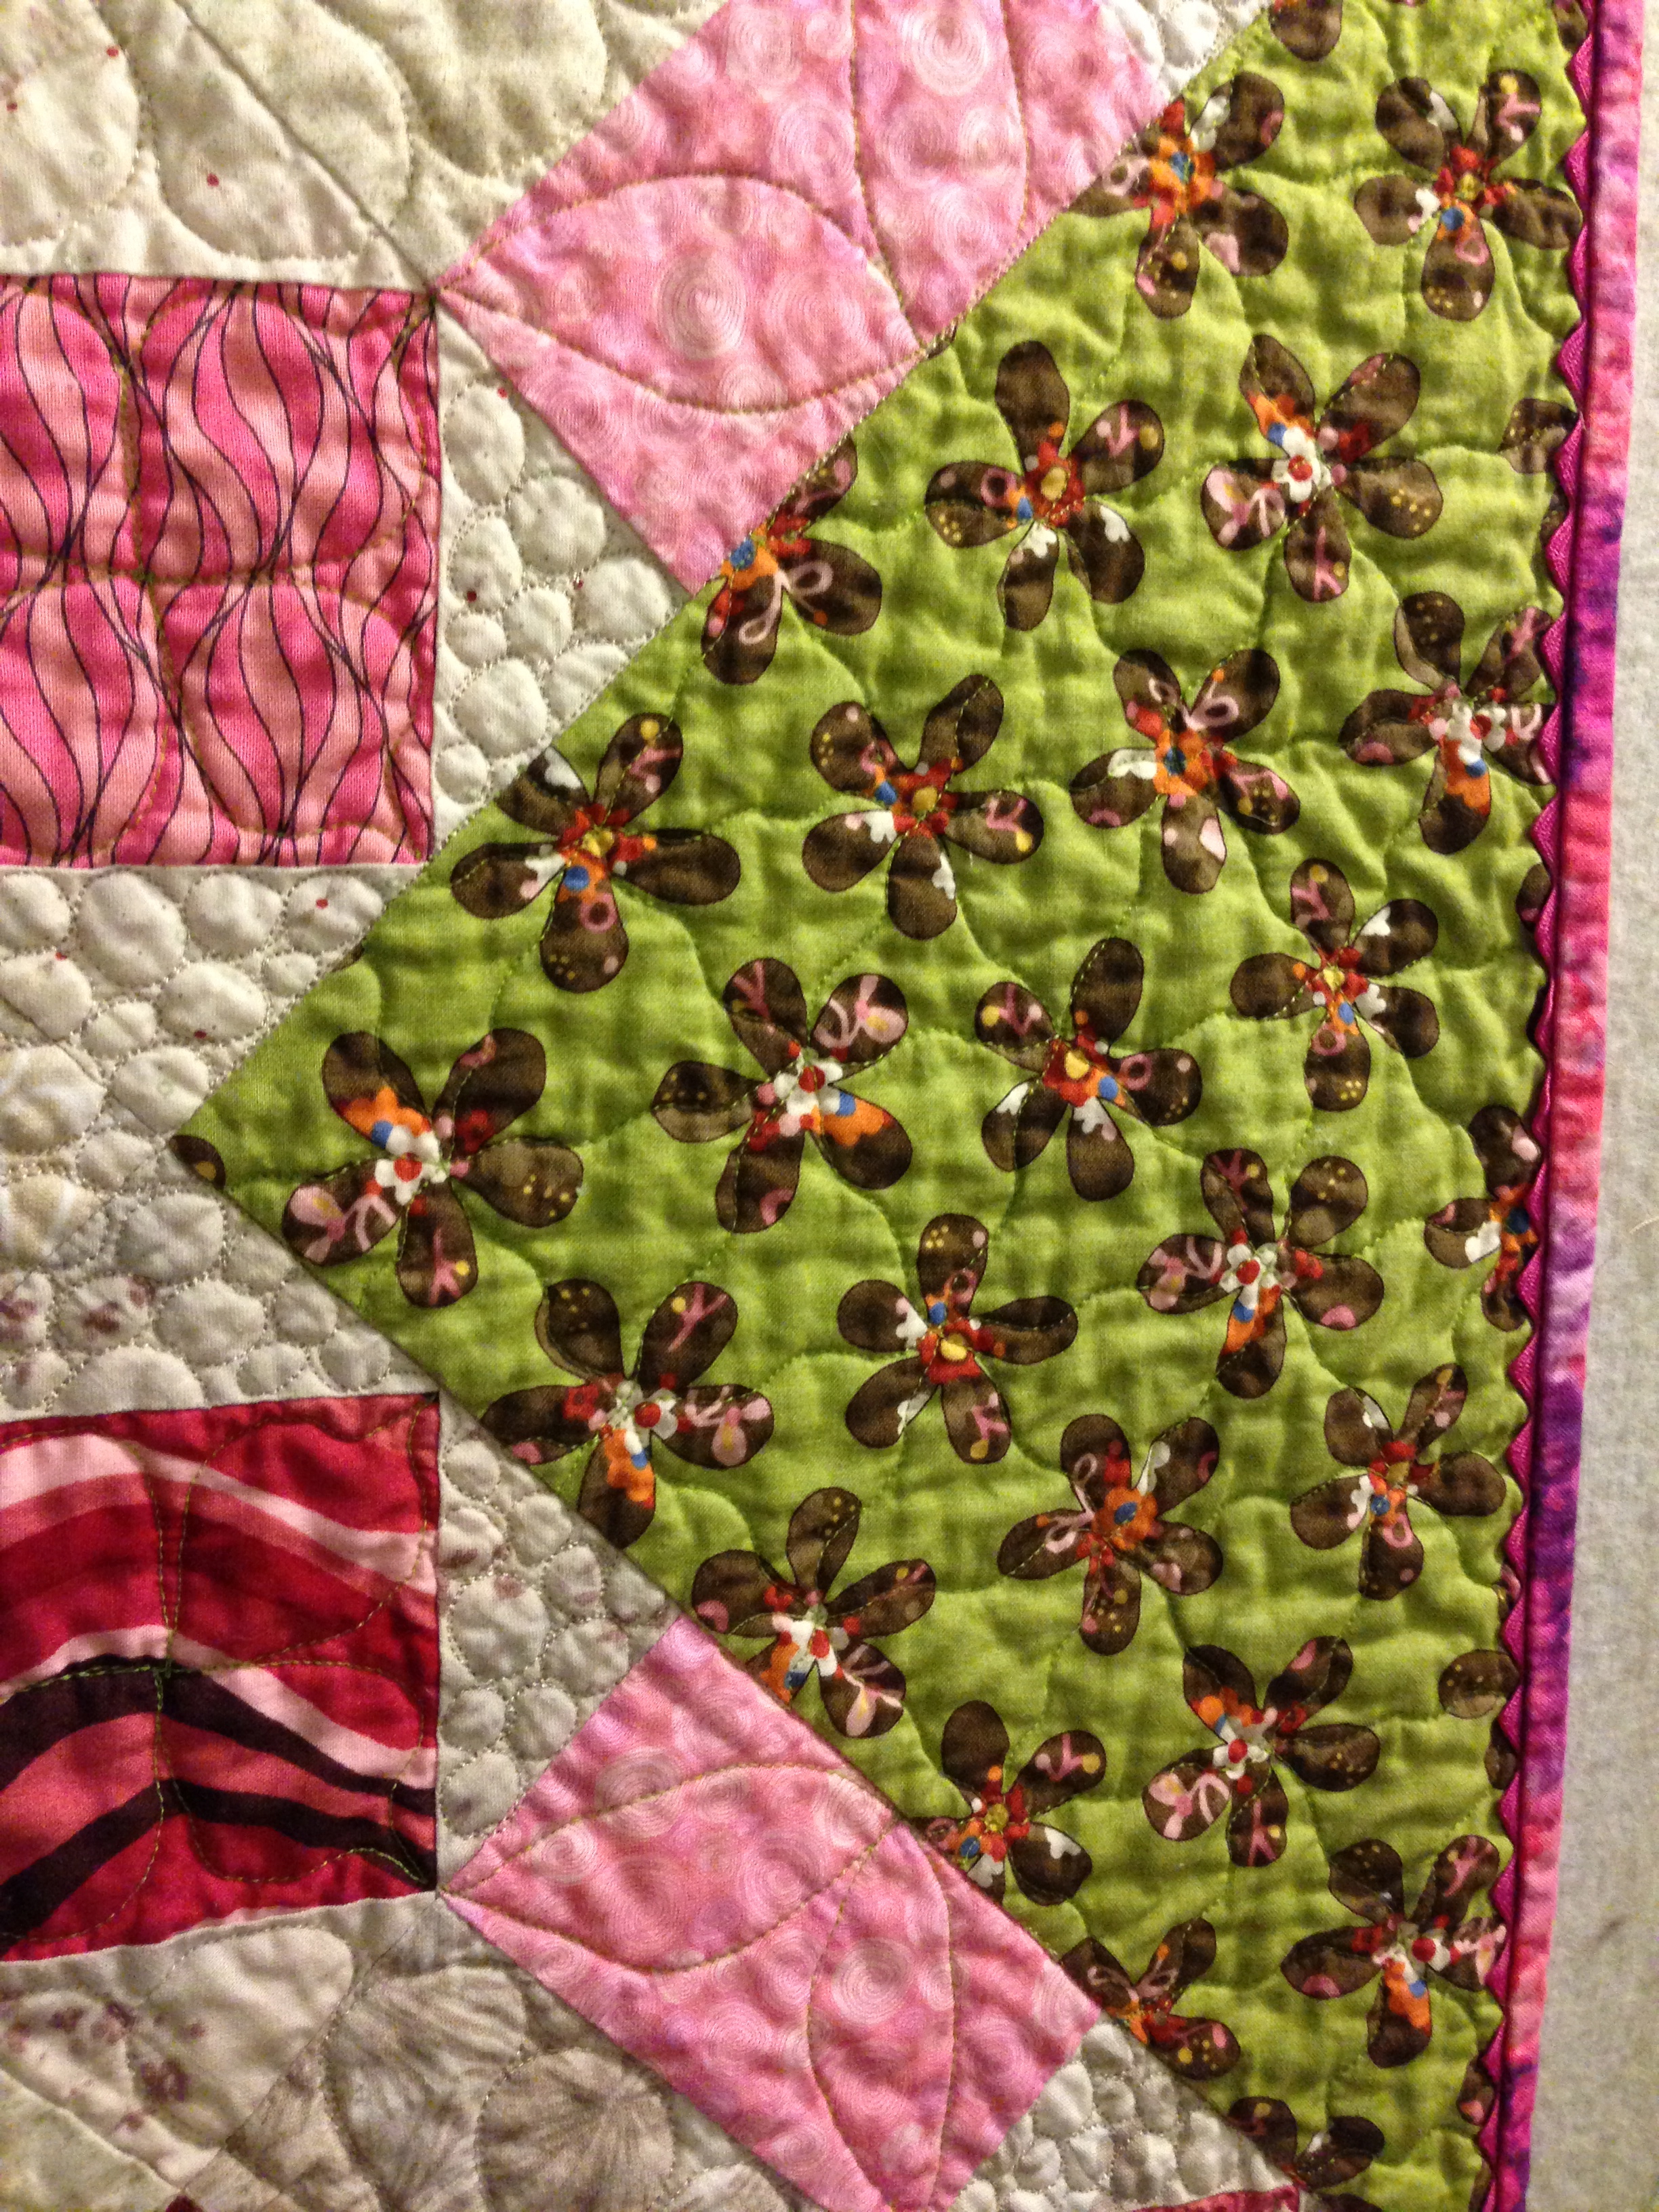
I appliqued Finley’s initials, as I had done with Ronan’s quilt, in the upper left corner, and used the remaining three corners for her birthdate and two swirly hearts based on the design on a yoga t-shirt I have. In the interests of time I just did fusible applique with a mini zigzag in matching thread, and then quilted the daylights out of them. Those appliques are not going anywhere.

Applique detail, Finley’s Quilt
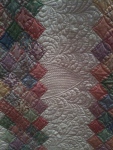
I managed to finish piecing the quilt before my maternity leave ended April 8th and I went back to work. I used the rejected taupe and green floral for the back (after all, it matches!) using the remnants of the green from the corners and a rejected green pin dot to stretch it to fit. The quilting was a mix of my old standbys and some new techniques; I did freehand flowers and leaves in the pink and purple rectangles and square-in-a-squares. I wanted to emphasize the illusion of circles created by the straight line piecing of the Rolling Stone block, so I quilted freehand feather wreaths in the center of each block, marking only the circular spines. I then filled in the other background shapes with pebble filler. I quilted the setting triangles with a 60-degree grid of serpentine lines, using the centers of the flowers in the fabric print as my guides. The corners got freehand mini Baptist fans with strings of pearls in the applique.

Quilting detail, Finley’s Quilt
I left the center squares unquilted, both to avoid obscuring the print and because I couldn’t decide what the best design for them would be. I’ve been heavily influenced lately by Wendy Sheppard’s Ivory Spring quilting blog; she does gorgeous, creative, prolific work on a domestic sewing machine. She frequently leaves much larger pieced areas unquilted than I’m used to seeing, adjacent to elaborately quilted designs, so I thought I could do a lot worse than to emulate this in my own work. As of now, I think it’s successful! And there’s the additional advantage that if at any future point I change my mind, I can always add more quilting. After all, I learned my lesson from Alice in Wonderland:
`I’ve had nothing yet,’ Alice replied in an offended tone, `so I can’t take more.’
`You mean you can’t take LESS,’ said the Hatter: `it’s very easy to take MORE than nothing.’
I finished the quilt with a binding with inserted rickrack, using Susan Cleveland‘s technique, as I thought it added an appropriate element of whimsy.
Quilting and binding detail, Finley’s Quilt
And the quilt was done in time for Show & Tell at the June quilt guild meeting, a full week before Finley turned four months old. I think a happy dance is in order, don’t you?
I’ve gone to the Silly Symphonies well before for these video links, and this one from 1933 is esthetically beautiful, delightfully bizarre and, appropriately for this post, baby themed:
AQS Lancaster 2012 (and 2011!)

Monkeying around at the quilt show
I can’t believe more than a month has passed since the AQS Lancaster Quilt show. Spring is apparently when time gets away from me more easily: I had actually started to write a post about last year’s show, but got busy and never finished or posted it. So I’m going to beg your patience and try something a little different: let’s call it a time travel post! Starting in the past:
On Saturday, March 19, Ronan and I attended the AQS Lancaster Quilt Show. We met Diane and Lisa there, and spent from 10 am to 4 pm on the premises. The crowds were decent, but not unmanageable; although it was the only weekend day the show was open, it was also the last day of the show. Quilts were viewed, stuff was bought.
So far, everything from last year applied to this year’s show as well. I reiterate my frustration with AQS’s policy of running their shows Wednesday – Saturday rather than continuing to Sunday the way the Mancuso shows do and Quilters’ Heritage Celebration always did. The rationale that’s given at my father-in-law’s model railroading shows is that vendors who have brick-and-mortar stores can be open on Monday if they have Sunday to travel and unpack. Yet at the same time, I frequently hear representatives of both hobby communities lament the increasing average age of hobbyists and bemoan the difficulties of attracting younger people. Talk about unclear on the concept! Younger people work, or attend school, or have young children. In this economy, I see plenty of people who are afraid to take a day off work for dental treatment, let alone to attend a quilt show; child care is also frequently easier to arrange on weekends. To me, having the quilt show end on Saturday is saying to young quilters, “We are not at all concerned about making your attendance easier, because we don’t need you.” Not exactly the message I’d expect.

"Blue Rhapsody" by Carolyn Rider. Breathe, Sarah, look at the pretty blue quilt and calm down...
Hey, who left that soapbox out? Anyway, back to 2011:
Based on a rereading of my blog posts from last year’s inaugural AQS Lancaster show, I’d very much like to claim to be a great predictor of the future. However, my March Madness bracket hanging in the office lunchroom puts the lie to that. So I’ll have to settle for believing that the powers that be at AQS must be very perceptive, receptive, and willing to fix what doesn’t work. I’ve been impressed with the organizers of Quilting with Machines on the very same counts, which gives me hope that the future of organized quilting is with people who are open to change.
First, and most important, it was all under one roof this year– no more silly Liberty Place nonsense. And as if that weren’t triumph enough, they utilized the space they had in the convention center far more effectively for displaying the quilts, placing them in the most brightly lit areas of the main exhibition hall. The displays are still chained off, making it difficult to see details on the center quilt in each group of three, and AQS policy is still that no turning of quilts is done by the “white glove angels” to show quilt backs, but overall the quilt viewing experience was vastly better this year.
Again, nothing to add. They’re still playing with the layout of the competition quilts on the main floor, and I think this year was the best yet for traffic flow and lighting.

"Princess Argiope" by Martha Lorshbaugh. She made an arachnid quilt. I love this hobby so much...
I can’t talk about my show experience without discussing how different it was to walk a quilt show with a four-month-old. He was in his element: there were colors, lights, and lots of people smiling at him. He’s a little ham, and quite the extrovert, so of course he was smiling and showing off his dimple and generally flirting with everyone in sight. He was mostly well-behaved, only fussing when he needed to be fed or changed, and was willing to ride in his stroller for most of the day with just one interval mid-morning of needing the Baby Bjorn. That was when I had my big moment of starstruck quilt geekdom, when Rachel Pellman (!) came over to me (!!) to confirm that I was the pregnant woman she had talked to at a guild meeting last August and to see the baby!!! So Ronan made Rachel Pellman remember me! I can live with that. Far better than if she’d said, “weren’t you the one who told that cat vomit story at a guild meeting?”
It was even different again to attend with a 16-month-old. Ronan was very well behaved in his stroller, smiling at ladies and even reacting to some of the quilts!

"Out On A Limb" by Ann Horton, Joyce Paterson, & Renee Gannon. Ronan reached out for this quilt with both hands and jabbered away about it!
I tried to be as considerate and unobtrusive with the stroller as possible, and while the multilevel nature of the convention center required me to spend a far greater fraction of my day waiting for elevators than I would ideally have liked, I can’t fault the facilities otherwise. There was a lovely “family bathroom” in the main exhibit hall that made changing Ronan very easy and convenient, and the third floor had clever little banquettes built into the wall that made for a quiet, private place to feed him. Overall, good baby and good environment made for an excellent experience.
That quiet area on the third floor also worked out this year as a place for him to run around and burn off some energy after having been in the stroller for too long.

A well-deserved break in the quiet 3rd floor hallway
As I’ve been trying to do at most quilt shows I’ve attended lately, I kept fabric purchases to a bare minimum, just a panel for a gift and some interesting salesman samples still on their cardboard hangers. I did buy a decent amount of thread, hitting the Superior Threads booth as anticipated but also getting some to try from Fil-tec, which is located right in relatively nearby Hagerstown, MD. I also fell victim to my usual Achilles’ Heel, intriguing notions and gadgets, with the purchase of a set of strip pressing bars that have already made themselves very useful in my studio.
But of course, as always, the stars of the show were the quilts. I’m always looking for inspiration for quilting designs, as well as just enjoying the beauty, especially the unexpected. The official show website has better pictures than I could ever take of the top ribbon winners, but here’s a sample of some of the others that stood out to me:
-

- “Neuron III” by Pamela Kirsch
-

- Detail, “Pane Reflections” by Timna Tarr
-
- Detail, “Boston Common” by Peggy Holt
-

- “My Spirit Is In the Rogue” by Nancy Lee Chong
-

- Detail, “Bohemian Fireworks” by Sandra Peterson
-

- Detail, “Let’s Start!” by Ikuyo Kitada
-

- Detail, “An Unexpected Snow” by Laura Fogg
-

- “Astral Burst” by Beth Nufer
-

- Detail, “Tea With Miss D” by Sandra Leschner
-

- Detail, “Birds in Hand” by Mandie Burrell
-

- Detail, “A Garden Romance” by Glenda W. Ely
-
- Detail, “Parrot’s Paradise” by Judy Woodworth
Last Post about QwM 2011: Vendors

Some final cleanup! (This was a broken shredder, imprudently left in the hall prior to disposal)
I was very well-behaved at the vendor mall for QwM: I did not buy a single piece of fabric! Not one!
(And no, I wasn’t sick.)
Part of it was the realization that I am so over full-priced fabric. First of all, I don’t need anything. I could quilt for literal years without needing to buy any fabric. I can possibly justify buying some larger pieces for borders and backs as needed, but over all, a fabric has to be pretty darn special for me to feel comfortable paying full price for it– especially now that full price is $10.85 or more per yard! The cotton price increase I had posted about last year has definitely arrived, giving a whole lot of quilters a pretty significant case of sticker shock not only at recent shows, but also at the local quilt shop. And since it’s usually the shiny new full-price fabrics that vendors bring along to the shows, not their discount rack, I only had to use a small amount of willpower to keep my wallet in my purse. If I’m going to buy any full-price fabrics, I’d rather give the business to the quilt shops near me who have given me so much in return over the years by way of service, support, advice, and the fostering of a greater quilt community.
Besides, this was Quilting with Machines! There were so many other fun things to buy that I definitely can’t find at my local quilt shops. MeadowLyon Designs was indeed there again this year, and as I posted when I had finished Ronan’s Minkee Dragons quilt, I had planned to buy at least one or two more of her “pictogram” designs. Well, she made the proverbial Offer I Couldn’t Refuse (although no horses were harmed in the making of this purchase.) The pictogram patterns are normally $18-20 each, depending on size, and Judy was running a show special of five patterns for $60! At that rate, it seemed like leaving money on the table to only buy two. So needless to say, I am now the proud owner of five more of her patterns.

In comparison, I was relatively restrained at the Superior Threads booth, considering I’ve already bought the thread for my upcoming big quilting projects, and I’m no longer using their titanium needles for machine quilting. I was considering buying some more NiteLite glow-in-the-dark thread to quilt my Halloween Buzz Saw quilt, but it doesn’t come in orange the way I thought it did, and I couldn’t settle on an alternate color that would look good. Instead, I bought two cones of Rainbows, their 40-weight variegated trilobal polyester, in Piñata for Halloween Buzz Saw and Neons just for fun. In fact, I used that Neons thread for all my class samples and really had a great time with it. I think that’s a thread I’ll be able to use for some Patsy Thompson-style hyperquilted feathers, as well as for anything I want to show up on a print. I also bought an entire 3,000 yard cone of Bottom Line in Tangerine, since in my studio, orange is a neutral.
At the Friday night banquet, which I attended for the third year, there are always door prizes donated by various sponsors and vendors, some of which are worth close to $100. For the first time, this year I won one! The good news was, I was the lucky winner of a Westalee adjustable strip cutting ruler from Quilter’s Rule. The bad news was, I already had it– along with their half-square and quarter-square triangle cutting rulers. I dearly love that ruler; someday I’ll have to do another Favorite Things post about the quilting gadgets and gizmos that make my quilting life more enjoyable, and that ruler would definitely make the list. But I didn’t need a second one. Fortunately, the very nice people at the Quilter’s Rule booth were willing to let me exchange it towards getting some design templates:

These are 1/8″ acrylic, in contrast to the 1/4″ acrylic used for longarm quilting templates, and therefore are at least half as expensive, but can be used for tracing directly onto fabric or onto Golden Threads paper for quilting designs. Sue Patten used shapes like these as the basis for the Zen-Sue-dle designs in the class I took. I’m excited to play around with them and see what I can come up with. The circles will be useful as different-sized arcs as I make my Spirograph-type designs with Renae Hadaddin’s circle and ray tool on Taupe Winding Ways (someday…)
But definitely the best thing I bought at Quilting with Machines this year was my Fine Line Quilter’s Ruler from Accents in Design. I didn’t actually buy it in the vendor mall, but instead from Beth Schillig during her feathers class.

That’s the sort of thing that frequently happens to me when I take classes: the most valuable thing I learn in any given class is often something only tangentially (if at all) related to the stated focus of the class! Beth was showing us a quilt in progress to display the feathers on it, but we students immediately zeroed in on the beautiful textured border quilted in close parallel lines like beadboard. She demonstrated how she accomplished it with no marking, which is a phrase that’s always music to my ears! I had accepted up to this point that acrylic templates for quilting were a longarm-only option, since you need to guide the machine head along them. However, Accents in Design has developed rulers with handles on the top and gripper strips on the bottom, like super-strength Velcro, so that the template can be used to move the quilt along the foot on a domestic machine. In addition, it has etched lines on the underside so that you can space multiple quilted lines evenly. Beth had brought along extras to sell, and I’ve been greatly enjoying it. In fact:

That’s a preview of my next “Finished!” post, which I could not have accomplished so quickly or sanely without this little gadget. More to come on that soon!
Triumph Over Tension Headaches!
As I’ve posted repeatedly here, I’ve been having a great deal of difficulty over the last year and a half with skipped stitches and poor tension in my free motion machine quilting. I’ve had my machine serviced repeatedly, adjusted tension, changed needles, changed threads, changed feet, and tried every trick in the book, and I was still getting repeated problems with skipped stitches on the top resulting in big loops of shredded thread, and knots of thread on the back of the quilt. These recurring problems had really put me off of quilting my projects, especially as I had limited time to pursue my hobby in the Age of Ronan.

"Mommy, how about you stop quilting and read me a story?"
I wish I could tell you about the single wonderful product that changed all this, or the secret button I found on my machine that cured everything, but instead, as with so many of life’s problems, it took several small incremental areas of change rather than one big revelatory one. The closest things I can identify to magic buttons were threefold: receiving Barbara Shapel’s “Art of Machine Quilting” DVD for my birthday, reading the entire Education section of the Superior Threads website, and absorbing every scrap of information I could from Leah Day’s website.
I had never heard of Barbara Shapel before I put her DVD on my Amazon wishlist, but the reviews were positive and it was the only quilting DVD listed on Amazon that I was interested in (and didn’t already own.) Since watching the excellent DVD and seeing her beautiful quilts I’ve started learning more about her; her blog only just went live, but I look forward to future posts. She makes art quilts, many of them double sided, and frequently incorporates painted fabric and heavy threadwork, so her quilting style is very different from my own. However, she quilts in a very organic style with little to no marking, and as she is self-taught, she brings a different perspective to several aspects of free-motion machine quilting. I haven’t adopted all her techniques, of course, but on her recommendation I have switched to a Schmetz Jeans/Denim needle for machine quilting, and have raised my feed dogs and set my stitch length to zero.
When Diane and I attended the Ricky Tims Super Seminar in Richmond, I enjoyed the privilege of getting to hear Bob Purcell from Superior Threads give his Threadology lecture. He did a very entertaining, audience-participation demonstration of how sewing machine tension works. He also stated what I’ve heard many quilting educators reiterate, that sewing machines simply aren’t designed for what we’re doing with them when we free-motion quilt. Even longarm quilting machines are based on the original technology for sewing two pieces of fabric together in a straight line with a dual-duty type thread. So we have to deviate pretty significantly from “factory settings” to accommodate this utterly different method of sewing. However, recently just playing with the tension (top and bobbin!) hasn’t been enough. I was really getting to my wits’ end. I studied everything I could on the Superior Threads website and gained further insight into the problems I was having, such as paying attention to whether the knots of thread on the underside of the quilt were top thread or bobbin thread. I also realized that I was using the HandyNets Thread Socks incorrectly: I was using them for storage, but taking them off when sewing. By leaving them on, I eliminated the occasional problems I was having with thread getting snagged on the base of the cone.
But it still wasn’t enough! Thank goodness, enter Leah Day. I found her website last spring when I did a Google search for “skipped stitches quilting Janome.” As it happens, one of her machines is the same as mine, a Janome Memory Craft 6500, so her advice was particularly applicable to my situation, although it is general enough to suit any domestic machine quilter. From there, I discovered her amazing Free Motion Quilting Project, in which she posted 365 free online videos of filler patterns, an absolute inspiration to anyone who’s struggled to find alternatives to just stippling. In July I was thrilled to see her listed among the winners at the AQS show in Knoxville. Based on her advice, I am using the Supreme Slider on my machine bed, a Little Genie Magic Bobbin Washer in my bobbin case, and have changed how my free motion foot sits on the quilt surface.
With all these individual “tweaks” to my quilting setup, things were improving dramatically. The cherry on top was my realization that my stitches were too short for the thread I was using, so I decreased the speed on my machine so that “flooring it” with my foot pedal resulted in better control. With almost no skipped stitches or thread snarls, I was able to finish this:

Minkee Dragons, 37" x 45": I promise it looks better in closeup

See? Detail, Minkee Dragons
I had started a version of this project last fall before Ronan was born, shortly after blogging about it here, but the mottled dye pattern on the Gelato Minkee was too distracting. I bought the solid Minkee in early spring, but the “quick project” I was expecting turned into anything but, when my thread kept snarling. I’d had this project set aside in a big guilt pile in the corner of the studio ever since. It was supposed to be my warmup for quilting Ronan’s quilt, and instead just set me despairing of ever doing quality free-motion machine quilting again. But now the cloud has lifted! I was able to quilt the remaining 7/8 of the pattern in about the same amount of time as it took to quilt the first 1/8 with all the tension problems. Quilting on the Golden Threads paper for this project was rather delightful. I found I didn’t need to use my Machingers because my bare fingers were quite grippy on the paper. The lines were extremely easy to follow, since they were Sharpie lines. Once the quilting was complete, removing the Golden Threads paper was nowhere NEAR as arduous a task as I was expecting it to be. So in short, I would absolutely do this again. If Meadowlyon Designs is a vendor at Quilting with Machines again this year, I look forward to buying at least one more of these “pictogram” designs, if not more.

My first attempt at Minkee Dragons: poor contrast and big thread knots
This was a fairly short-term UFO, but it is nevertheless finished and out of my physical and psychological space. As such, it deserves a happy dance. We’ve been watching a great deal of Star Trek: The Next Generation on Netflix streaming lately, so this clip immediately sprang to mind. It’s not from an episode (too silly!), but was filmed as a birthday surprise for Gene Roddenberry. Thanks to YouTube, we all get to enjoy it:
Product Review: Clover Protect and Grip Thimble
It really shouldn’t surprise anyone that I’m somewhat of a notions nut. I certainly am a believer in having the right tool for the job; what I need to find, however, is the happy medium between, on the one extreme, being the person trying to use a nail file as a screwdriver, and on the other, being the person at whom all those “as seen on TV” product commercials are aimed. Heaven forbid one might attempt to apply lotion, flip a pancake, or answer the phone while under a blanket, without the newest labor-saving product! Thus is my dilemma framed: I want to try every sewing product that promises to make my limited quilting time more pleasant and successful. At the same time, I don’t want to fill my already crowded studio with the notions equivalent of the Pasta Boat. So I will attempt to document here my trials of some of the products that seemed worth the money.
My love of Clover products is only partially based on their beautiful ads in my beloved Japanese quilt magazines. It’s also based on the fact that they seem, on the balance, to be worth every penny of their relatively high price. They appear to work both ends of the notions spectrum equally well: everyday basics, such as their silk pins and easy-threading needles, display unerring quality and consistency that seems to be lacking in other commonly found brands, while innovative products, such as their yo-yo makers, thread cutter pendants, and fork pins, surprise us in the “I never knew I needed that!” vein. So when I saw that they had a flexible-sided but metal-capped thimble, I thought it might be worth a try.

Clover Protect & Grip Thimble
Let me back up a bit. Thimbles are things I never really considered until a few years ago, because I’ve never been much for hand sewing. When I started quilting in my teens I wanted to do everything by machine out of impatience, and when I picked it back up about ten years ago, my other primary hobby was counted cross stitch. Therefore, I felt I already had a hobby for when I wanted to sit with a needle in my hand; quilting was for the machine. But I have mellowed in the last ten years. I’ve realized that not only does hand applique produce the results I like best, but there is a rhythm and a meditative beauty to the process as well. I’ve also had to face facts that there are times when only a hand-stitched binding will do. And as I’ve started to make more purses and other small quilted projects, I’ve had to get more comfortable with hand-finishing the details that a machine just can’t access. (I’m still not a hand quilter, though. Give me time.)

My favorite thimble
My favorite thimble, hands down, is my Roxanne thimble. I bought it at the hand-quilting class I took from Didi McElroy, so she fitted it for me personally, and I love it for being so well-designed. (I’ll never need the long manicured fingernail protector, though!) Being a dentist, I’m a stickler for ergonomics: if I develop degenerative musculoskeletal problems with my hands, I’m potentially out of work. Therefore, I’m very glad this was the first thimble I ever used regularly, so I didn’t have to unlearn any bad habits. The only problem with the Roxanne thimble is the cost: I think I paid $79 for mine in 2004, before all the metal prices skyrocketed; the same sterling silver model now sells for $110. Needless to say, as much as I love my thimble, I’m not buying one for upstairs and one for downstairs, or one for each project bag. If I’m going to be doing a great deal of hand sewing, I use my Roxanne thimble, which usually resides in the living room near the comfy TV-watching chair. But if I just have a little bit to do, I don’t want to have to leave the studio and fetch it, especially if Ronan’s in his doorway jumper. So I have experimented with alternatives, most of which have ended up in the drawer next to my sewing machine and will be donated to the next Guild Boutique.

The usual view from my sewing table
Since I have a horror of pushing the eye of the needle into my finger (based on experience, not just imagination) I had never before tried any of the jelly thimbles, despite how pretty they look sitting in the glass display jars at quilt shops. But since this one had the metal cap, I was willing to give it a try at $8.95. Plus, it came in orange! The fit was excellent, especially as it warmed to body temperature; this didn’t surprise me, as the package had a helpful cutout at the top to check for sizing. The thimble was comfortable to wear and to use, with nice deep dimples in the metal cap to make controlling the needle easy.
Some of the downsides to using this thimble were, for me, just a result of being used to using the Roxanne thimble and thus trying to push the needle through with the pad of my finger rather than the tip. But the main problem I had with it was one that anyone, even those used to using a traditionally shaped thimble, would encounter: right where the metal cap meets the plastic body, the thread gets caught! In the process of sewing down all of about two feet of binding, I had to unsnag my thread five or six different times. Very annoying! To be fair, “snag” isn’t exactly the right word, as it didn’t in any way shred the thread, just captured it and released it intact. But while it didn’t seem to damage the thread, it definitely threw me off my rhythm, albeit not enough to run downstairs and retrieve my Roxanne thimble.

SO annoying...
Verdict? Mixed. This is definitely the most comfortable thimble I’ve used that wasn’t my dear Roxanne. And with some practice, I’m sure I will stop trying to skewer my finger by pushing with the squishy plastic part. But the thread capture issue is the dealbreaker, and if that doesn’t lessen, this thimble will be joining its shiny brethren at the Guild Boutique table at next year’s quilt show.
Edited 2/20/12 to add: This post is part of Bonnie Hunter’s Thimble Linkup:
http://quiltville.blogspot.com/2012/02/its-thimbles-up-monday.html
Psst! Lady, Wanna Buy a Sewing Machine?
I had a request for this story after mentioning it in passing in my last post, so here goes. Sorry for the length, but it is all true, and decidedly stranger than fiction.
I can’t title this, “my first sewing machine,” because that title belongs to my mom’s Bernina, which continues to be her one-and-only. Despite its being nearly as old as I am, it still sews like an absolute dream. She likes to tell the story that when I took a home ec elective in 8th grade, I raised my hand and told the teacher my classroom machine was broken. When the teacher came over and checked, she said it was working fine. I said, “but it’s making that horrible noise.” She responded, “that’s what sewing machines sound like.” I said, “not my mom’s.” “What kind is it?” “A Bernina.” “Well, that explains it.”

My mom's Bernina 800, purchased in 1976 and still going strong
I can’t even call this story, “the first sewing machine I bought for myself,” because that distinction belonged to a 50’s- or 60’s-era store branded machine, mounted in a cabinet, that I bought for a dollar at the Monday night auctions in Annville, PA, where I went to college. What a great place for college students to find furniture! Many of the ugly couches on campus were purchased for under $20 at the auctions, back in the days before Craigslist and Freecycle. I used that machine to make a duvet cover and some curtains for my boyfriend at the time, but the tension was so far out of whack that I had to run each seam between my fingers after completing it to distribute the gathers the stitching caused. It’s possible that a trip to the sewing machine doctor would have cured what ailed it, but I lacked both transportation and funds. Also, this particular machine was straight stitch only, and a zigzag is nice to have. So that poor machine went to the curb rather than continuing to fight with me.
By the following summer, I was dating my now-husband, and I wanted to make costumes for us to wear to the Pennsylvania Renaissance Faire. I knew better than to try for another $1 special from the auctions, but I didn’t have the disposable income to spare on a new machine, even a cheap one. Knowing what I know now, it’s undoubtedly for the best that I couldn’t afford a new cheap machine, as by the early nineties they were mostly plastic construction and not worth the money. I know of far too many new sewers who make the mistake of buying an inexpensive machine from Target or Costco after being inspired to sew by watching Project Runway or DIY Network, only to find they spend more time fighting with their machines than actually sewing. I know of nothing that discourages a new quilter more quickly than a “bargain” sewing machine. What I now normally recommend to someone who wants to sew but either can’t afford, or doesn’t want to make the commitment to, a high-quality new machine is to hit Craigslist, eBay, the repair shops, and the yard sales and find a good, solid, metal machine, a Kenmore or a White or a Necchi or a Singer from the 1960’s. Not only do these machines tend to be adorable, but they’re indestructible as tanks.

A vintage White sewing machine from my own collection. Atomic cute!
So: back to my story. I wanted a sewing machine for less than $100 that would actually form a reliable straight stitch and zigzag. I looked through the local Pennysaver paper (remember those?), expecting that any sewing machines I might find would be from estate sales or attic cleanouts, and therefore might not be in working condition. However, I found a listing from a sewing machine dealer who said he had second-hand, freshly serviced machines starting at $29. I called, expecting to be given directions to a shop. Instead, the man who answered said that he’d come to me. I gave him directions to the campus and we set up an appointment.
Once again, my expectations were confounded. I expected to meet a van or a panel truck. Instead, a rangy older man pulled up in an avocado green, two-door, seventies sedan that was packed to the absolute gills with sewing machines. There was literally only room for him to sit in the driver’s seat: every other available space was occupied by sewing machines. The seats were covered, the footwells were full, some machines in cases but most without, with cardboard boxes of footpedals, light bulbs, power cords, and who knows what else balanced precariously wherever they’d fit. I tend not to find myself speechless as a rule, but this was definitely one of those rare occasions. As he explained, he didn’t have a shop of his own; rather, he went around to sewing machine repair shops and bought up abandoned machines which he then resold. I deeply regret not having had the inspiration or the opportunity to take a photo, but suffice to say the mental picture has held up well these 17 years. Made an impression, you might say.
We got down to business: I explained what I was looking for and what I was willing to pay. He opened the trunk (apparently the location of his “zigzag machines under $100” department) and sold me a two-tone brown-over-tan Kenmore for $79. It had the mounting brackets from having formerly been housed in a cabinet, but I always used it on a desk or tabletop. He somehow managed to get the trunk closed again — even minus a machine, it still appeared impossibly overfull — and went on his mysterious way.
That sewing machine and I had some grand times. Not only did I make Dan’s and my Ren Faire garb, but I made Halloween costumes, sorority letter sweatshirts, the previously mentioned friendship quilt, and even one of those poet blouses that were so popular in 1993. I also learned quickly that having a sewing machine in one’s dorm room is an excellent opportunity for practicing saying “no” to the myriad people who suddenly think you’re going to be thrilled to do their mending for them. That selfsame old workhorse Kenmore was the machine I made my wedding gown with, years later.

Our wedding day, May 24, 1997.
I finally had to sacrifice the Kenmore; its zigzag gear cracked in half and could not be repaired or replaced. By that point, I had moved several times, graduated from dental school, and had rediscovered quilting. The tiny throat space on my Kenmore was ill-suited to machine quilting, and I had found a 1920’s Featherweight at an antique mall for a surprisingly good price, so I didn’t need another straight-stitch-only machine. When we moved to our current house, in the interests of decluttering, I got rid of it. I can’t say I regret that decision; I don’t want to be the kind of person who lugs around a heavy, bulky, not particularly attractive, broken appliance out of pure sentiment. (The third season of “Hoarders” starts on Labor Day!) But I will always have fond memories of that machine and the experiences I had with it.
And I’d like to think that somewhere, in the wilds of central Pennsylvania, an old man is still driving around in his old green car packed perilously full, making matches between young women and old sewing machines. Like some sort of enchanted peddler out of a fairy tale, he certainly had exactly what I’d wished for, to help me reach the next chapter of my story.
Wonderful Things for Retreats
Writing my home retreat post had me thinking about a few of the items I own that make it a whole lot easier to quilt in places other than my studio. So if you’ll indulge me in some delusions of Oprah, here are two of my favorite things. And no, nobody’s getting a car.
Although I only participate in a few events per year that require me to have portable quilting supplies, the following products certainly were in use in my dining room for the home retreat weekend and are among my favorite and most highly valued sewing-related purchases of all time:
 Although I have a design wall in my studio, made of felt covering a piece of foam housing insulation and mounted to the wall, it’s only 4′ x 8′ because that’s how much wall space I have available in that tiny 9′ x 9′ room. It’s great for smaller projects or for individual blocks, but when it comes to a larger project it’s great to be able to break out the big gun. I actually bought the set of three Cheryl Ann’s Design Walls at Quilt Blossom Festival a few years ago: 6′ x 6′, 3′ x 3′, and 18″ x 18″. They came as a set for a show special price, which I recall being around $220. I probably should have just bought the 6′ x 6′, as it’s the only one I’ve used repeatedly, but I’m a sucker for a deal.
My initial thought was that I would use these for classes and retreats, plus the occasional setup in the upstairs hallway for a big quilt layout, but the sad reality is that my 6′ x 6′ design wall pretty much lives in my narrow little upstairs hallway full-time. I take it down only when someone is coming over for whom I like to maintain the pleasant fiction that I’ve grown up enough not to leave my toys out. The cats also enjoy it; we refer to it as the Fabulous Kitty Fun Tunnel. (I’ve written a jingle. And no, I’m not going to sing it.)
This design wall is one of those amazingly well-designed and -executed things with which I like to surround myself. It goes together and comes apart very easily; the corner pieces have a tendency to slip off but that’s easily fixed with a little wrap of electrical tape around the tips of the frame poles. The flannel came preshrunk and is washable, which is very nice considering one of my most frequent uses of the wall is for spray basting. And for the (rare) occasions when it isn’t standing in my hallway, it comes with its own carrying case and breaks down nicely into a portable package. The manufacturer has recently come out with a new accessory that they have made available as an add-on to previous purchasers, a move that always endears a manufacturer to me: stabilization rods that will help keep the easel-style support poles from slipping on wood or tile floors. I haven’t bought them, as I’ve only used the support poles once, for a workshop; I just assemble the frame and then lean it against the wall. But it’s nice that I could get them if I needed to.
 I coveted one of these for years, but the $249 price tag kept me away. Then I went to MAQ in 2007, spent all weekend sewing happy little taupe winding ways blocks with my sewing machine up on one of their tables, and came home with horribly sore shoulders, neck, and back. A few weeks later I attended Quilt Odyssey, bit the bullet, and made one of the wisest investments in my quilting ever. The Sew Ezi table is light, collapsible, portable, easily stored, and once again, very well engineered. It is customizable to any machine so that the acrylic insert surrounds the machine bed, creating a flat, smooth surface conducive to machine quilting and placing the machine bed at a very ergonomic height. On ordering, you tell the company what machine you have, and they custom-cut the acrylic insert based on information from the manufacturer; you don’t have to measure your machine. You can also get multiple inserts to use the table with multiple machines, as well as an insert to use the table as a lightbox.
It was very easy to initially assemble, and continues to be virtually effortless to set up and put away. The wheels make it very easy to transport to and from the car, but are tucked neatly out of the way during use. I use it at retreats, at classes, in order to sew in rooms of my own house other than my studio, to sew with my mom at their house, and I even set it up in front of my studio sewing table when I’m machine quilting a large quilt, for extra support. Love it!
It’s easy to fall into the trap of shopping for quilting supplies instead of actually quilting. There are plenty of quilters out there who manage to have the time and money to acquire all the state-of-the-art notions, tools, machines, and accessories, but never seem to get around to actually quilting. (I’m trying not to be one of them.) But at the same time, there is no denying that having the right tools makes quilting far more enjoyable. Perhaps our foremothers quilted by candlelight with just a needle, thread, and a pair of scissors, but I don’t think they’d have turned down an Ott-Light, a Bernina, and a rotary cutter!

