Posts filed under ‘WIPs’
Hooray for Quilt Guild Retreat!
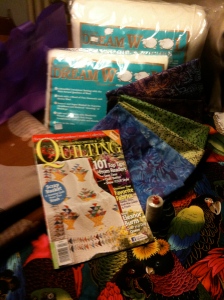
On a recent weekend I attended the spring retreat for my quilt guild. I’m determined to get my 2007 Shop Hop quilt finished for our guild show in June, so I didn’t bring any other quilts to work on. (More on that shortly.) However, I knew that it’s not good for me to sit in one position for too long at a stretch, and I wanted to have something productive to do while I pondered any quilting decisions. Therefore, I also brought my scrap bag:
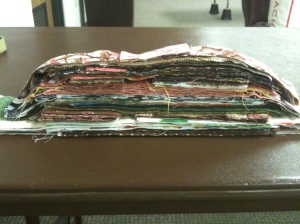
As I’ve previously posted, I’ve been trying to implement Bonnie Hunter’s Scrap User’s System. I’ve been doing pretty well with cutting up scraps as I cut fabric for new quilting projects, but I still have a huge backlog from before I started. Every time I felt like I needed to stretch my back or walk around, I’d meander over to the cutting table and cut scraps for a while. I estimate that through the course of the weekend, I probably spent 3 hours sorting and cutting up scraps. I had a nice collection of strips, blocks, and squares to show for my efforts by Sunday afternoon:
And here’s an “after” shot of my scrap bag:
Yeah. Really. No kidding. I did not stage this in any way; I didn’t fluff up the scraps, or pick up anyone else’s. Either the fabrics were extremely compacted in there and I just relieved some of the pressure on them, or I have some sort of bottomless, loaves and fishes scrap bag. And that’s a miracle I do NOT need in my life, thanks! So, my “Coach bag” will be a presence in my studio for a while yet.
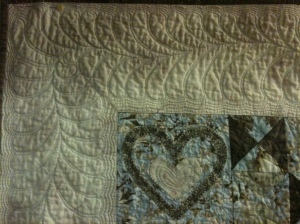
Anyway, I did spend the majority of the weekend quilting the Shop Hop sampler quilt. At the December retreat, I had completed all the stitching in the ditch and had quilted freehand feathers in the plaid setting triangles of the center strip:
At this retreat, I finished the setting triangles and quilted all 18 sampler blocks. This presented an interesting challenge, as nearly every block required me to come up with an entirely different quilting design. There were a few piecing doubles that gave me an intellectual rest. (As an aside, do we have a term for that in quilting: two blocks that are identical in the piecing, but appear different due to different value placement? If not, I’m thinking of something along the lines of the homonym/homograph/homophone terminology, but I don’t know who gets to determine these things. It’s not cut and dried like paleontology where the person who discovers the new fossil species gets to name it.) But with very few exceptions, each new block I came to was a new puzzle to solve. This added to the difficulty level but also kept the process much more interesting; repeating the same design 18 times would have gotten monotonous.
I still have a significant amount of work to do in the remaining six weeks before the show, but I know I can meet the deadline without pulling a bunch of sleepless nights. And if I have to eat those words, I promise to do it publicly.
And as always, I had a wonderful time at the retreat. It’s such a renewing experience to be surrounded by other quilters. And when you’re eating, sleeping, and breathing quilting, you start to see quilts everywhere. This was the floor in our bathroom:
Finished! Ronan’s Quilt
Way back in March, I had posted a picture of the quilt I was making for Ronan. I had finished Arianna’s quilt to give to her on the day both babies were baptized, and I really did believe that I’d finish Ronan’s quilt shortly thereafter. So here we are, more than nine months later, and hey, it’s done! Obviously, it’s not that I’ve been working on it all this time, just that the small amount of studio time I get these days hasn’t been devoted to this project. I put the borders on over the summer, pieced the back, made the binding, spray basted the quilt, and… stopped. It was mostly fear of ruining this quilt top after all the thread problems I’d had, especially considering how many seam intersections there are in all those hourglass blocks. However, Halloween Buzz Saw was a great confidence builder, so I was willing to venture a try. My guild retreat the first weekend in December was a great opportunity to get a large portion of the quilting done.
I started by stitching in the ditch with the walking foot to stabilize the whole quilt top, which allowed me to start the free motion quilting wherever I wanted to. In this case, I wanted to start with the feathered border. I’d been excited about this border ever since Quilting with Machines, since it was really the only place on the quilt where elaborate quilting would show. I used Robison-Anton #40 polyester thread in a light blue to quilt a Patsy Thompson-style free-motion feather after marking the spine and a 1″ margin inside the borders, then echo quilted on either side of it using Isacord polyester thread in a light tan. Although I’m happy with the overall effect, I had expected the light blue to contrast with the taupe border fabric enough to stand out slightly, and I expected the light tan to blend in more closely and nearly disappear. Instead, the opposite happened: I think the tan has better contrast with the border fabric than the blue. I can’t call it a failure, not by a long shot, but it’s a learning experience, and hopefully not a mistake I’m going to repeat.
The next section to be quilted was the hourglass blocks. I did have some difficulty getting my free motion quilting foot set properly to deal with the bumps where the seams meet, but I found that switching to the closed circular foot attachment rather than the open-toed one I’d been using solved the problem. It’s a little harder to see around, and it requires an extra step when starting to get the thread ends out, but it glides over lumpy block centers rather than getting hooked on any imperfectly pressed flanges of fabric. There must be a good reason why this is the style of all the longarm feet I’ve ever seen! I think I’ll be using this one from now on unless I’m working on a wholecloth, which isn’t particularly likely.
Since I knew the heavy piecing and busy prints in this section weren’t going to allow anything fancy to show, I kept it very simple: just some continuous-curve-variation loops. It looks prettier on the back than on the front, and I’ll have to remember it as a filler pattern for the future. However, once again I learned something about thread choice, in that I wish I had made a different one. I used the same fine tan thread that I’d used in the border, which means it vanishes in the light and medium triangles but contrasts highly in the dark ones. In retrospect, I don’t know if the better choice would have been to use a variegated thread, which would have played peek-a-boo throughout all the patches, or to use something that would have contrasted with all the fabrics, like a fine orange thread. I just know I should have used something other than what I did. It’s not terrible, just not right.
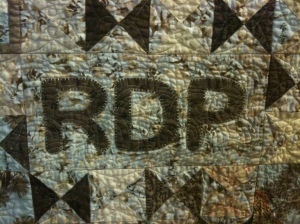
I’m happier with the results in the applique blocks. I used the fine blue thread from the border and quilted more heavily over the applique than I ever have before, because I didn’t want to take any chances with a little boy peeling off the pieces. The monogram block got an allover freehand mini Baptist fan, which only shows up on the dark letters but looks good that way, and the hearts block has echo quilting inside the appliques and a loop-de-loop filler in the background.
The large blocks featuring the owl print were left for last, in part because I kept equivocating as to what I was going to do with them. This print has so many large solid open areas that I didn’t want to just do a stipple-equivalent filler pattern, but it has enough busy areas that I didn’t want to get too elaborate, either. I also want to introduce meaning through the choice of quilting design whenever possible. So I traced Dan’s, Ronan’s, and my hands and used our handprints as the primary design, stitching them in orange So Fine #50 by Superior Threads. As this wasn’t enough quilting for these large patches, I then went back in and stitched the loop-de-loop filler in the light blue thread, as well as a heart inside each handprint. I am entirely happy with how these sections turned out. I love the idea that in years to come, Ronan will be able to place his hand over his tiny handprint and see how much he’s grown.
The binding is scrappy, using the longest dark taupe scraps I could find among the leftovers from Taupe Winding Ways. I made the binding over the summer when I finished the top and pieced the back, and I made more than twice what I needed for this quilt: I have no memory of whether that was a conscious decision or just bad math! Oh well, I know this isn’t the last project I’ll have a use for taupe binding on, so it’s not going to waste.
What’s a Ronan-appropriate happy dance? This was my best guess:
Little Happy Dances!
Wow, it feels great to get things finished! Even though none of these projects were on my “official” list of UFOs, they were still taking up both physical and psychological space, and it’s wonderful to have them out from underfoot, so to speak. Plus, as I wait for labor to start, finishing quilt projects is apparently as close to “nesting” as I get.
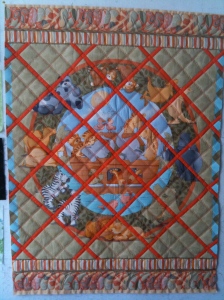
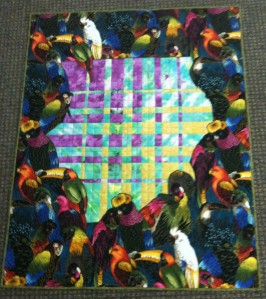
Noah’s Ark panel:
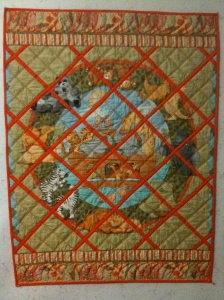 I picked up Mary Mashuta‘s “Foolproof Machine Quilting” for $10 on sale at Quilt Beginnings in Columbus, OH on our way out to Indianapolis in August. I have long been a fan of hers, first upon seeing her gorgeous quilts and wonderfully inspiring books (her book, “Confetti Quilts” would be on my desert island list) and second upon learning that she manages to amicably share a sewing space with her twin sister, Roberta Horton. However, for all that this book contained some great ideas, it was mostly centered around making walking foot quilting accessible to new quilters who’d been put off by free motion. Since that’s not where I am at this stage, I passed the book along to a friend.
But one of the ideas she’d stressed was using heavy threads and decorative stitches to make quilting show up on busy prints (for which she and I share a passion.) I didn’t want to do very intricate quilting on this piece, first of all because it’s just a panel that I tweaked by piecing in the lattice, but also because I didn’t want to detract from the graphic impact of the panel. The viewer’s brain already has to make the visual “jumps” across the lattice; I didn’t want to further confuse things by introducing a busy quilting design. So I marked a simple 2″ grid to echo, rather than compete with, the lattice, then used the walking foot with a serpentine stitch and orange Brytes by Superior Threads, a nice heavy 30/3 polyester with a bit of a sheen to it. I used the Pellon Legacy wool batting I’d bought at AQS Lancaster, which gave it a nice puffy loft. (I hesitate to say it, but I think I might actually prefer the Pellon to the Quilter’s Dream wool I used for Convergence Birds and have set aside for Ruby Wedding!)
I switched to my fancy new free motion foot, its first real test drive since I bought it at Quilt Odyssey, but left the Brytes in to do a no-mark, freehand Patsy Thompson-style feather in the top and bottom borders. I’ve been a huge fan of her Freemotion Fun with Feathers DVD series, but hadn’t had much opportunity to use her techniques in actual quilts rather than just on doodle cloths, and I’m very pleased with how it turned out. I quilted these feathers before I took her class at Quilting with Machines in September, and it acted as an excellent warmup. I wasn’t sure whether the feathers would show up in that busy print border, but apparently the combination of the puffy wool batting and the thick thread did the trick. I will have to remember that.
For the binding, I used the same fabric I’d used for the lattice strips, and Suzanne Michelle Hyland’s Sew Fast, Sew Precise Machine Binding technique that was so maligned by the show judges on my quilts this spring and summer — remember, “a hand-sewn binding adds refinement” — but that gets my quilts finished rather than languishing in limbo. Plus, I don’t think my baby boy will be so discriminating.
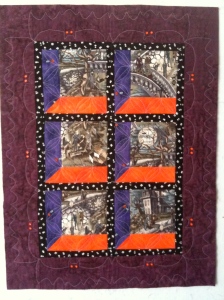
Mom’s Halloween Attic Windows:
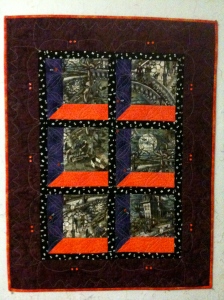 I had three big decisions to make when quilting this little quilt:
1) How to handle the border, which is decently wide and of a solid batik that would nicely show off the quilting
2) How to quilt the focus fabric squares without distracting from the fabric itself
3) How to use the glow-in-the-dark thread to best advantage.
It’s always tricky to quilt something for someone else. Even considering that my “client” in this case is my mother, whose tastes I have far more experience with and insight into than the average person’s, there’s still that worry that what pleases me might not please her. I know she doesn’t like extremely dense quilting, especially in contrasting threads. At the same time, I have this wonderful opportunity to use glow-in-the-dark thread on a Halloween quilt, and the NiteLite colors are all very light; I used the Purple, but against the deep plum border even it looks almost white. I used the Pellon Legacy soy blend batting, which only needs to be quilted every 8″, so dense quilting wouldn’t be necessary. I started with simple ditch quilting with the walking foot and fine, matching threads to anchor the center. That way, I could come back to the center once I’d figured out what to do with it.
I knew I wanted to do something spectacular in that border, yet that would still fit the whimsical theme of the piece. That was when I remembered the antique Easter quilt I’d seen in Fons & Porter, with an appliqued border of stylized bats that just looked like fancy swags at first glance:
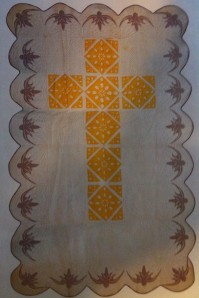
"Easter Quilt," by Bertha Amelia Meckstroth, 1933 (from Fons & Porter's Love of Quilting Magazine, July/August 2010)
That idea was way too much fun to leave alone, so I modified a simple bat design from an online coloring page (great resources for simple shapes and line drawings!), sized it to fit, and then used another technique from Mary Mashuta’s book to mark them: I cut them out of freezer paper and ironed them onto the quilt top, then did my freemotion quilting just outside the edge of the paper. This also allowed me to fudge the measurements where I needed to, and obviated the need to do a lot of marking on a dark fabric. I hadn’t originally intended to add the button eyes, but I wanted to make the shapes more clearly recognizable as individual bats, and especially with the “spooky eyes” fabric as the sashing, I think it maintained the mood.
I wish I could post a picture of what it looks like glowing in the dark, but I do not have the right camera equipment for that. In fact, I have a phone, which is not going to cut it. But let me assure you, it’s pretty impressive. So I decided to just use the NiteLite for all the visible quilting, even though it’s higher contrast than I would have otherwise dared. That also solved my dilemma for the Attic Windows sashing, as I didn’t really want to have to change threads between the purple and orange segments. I chose the design partly as a quilting pun: it’s a variation on the old Pumpkin Seed design, which I thought was both thematic and pretty. Add some diagonal lines to tame the focus fabric, and it’s done! This also got the machine binding treatment: it’s a wallhanging, for goodness sakes! I did hand sew the hanging sleeve, though. Isn’t that batik adorable?
Matt and Alyssa’s quilt gets its own happy dance post, after all the trials and tribulations of what was supposed to be a simple project. So here’s my preliminary happy dance for the two smaller projects, and I’ll indulge in a grander one in the next post:
Quilting with Machines 2010, Part II: The Vendors
This will be a much shorter post than the recent monster about classes, although I wish that were because I hadn’t bought much. While I still managed to get away without buying any fabric, the unique nature of this show meant that I had the opportunity to purchase things I don’t usually get exposed to. I actually hadn’t expected to buy too much, as the vendors were very much skewed to the longarm demographic: several booths selling actual longarm machines, several more specializing in pantographs, quilting templates, and software for computer-guided machines. I expected to buy some thread from Superior Threads, of course, but not much more than that. HOWEVER:
Stencils. I’ve mentioned before my weakness for quilting stencils, and there was a good selection from companies I don’t normally encounter at traditional quilt shows, such as Patsy Thompson; StenSource, who makes DeLoa Jones‘ stencils; and a company I’d never heard of before, The Calico Kitten, that had some really interesting designs by Linda Mae Diny.
Pantographs. As a domestic sewing machine quilter, I had written these off as a longarm-only (or at least frame-quilter-only) item. But hanging in the show was a simple Minkee crib quilt that had been quilted in an all-over design using a slightly darker thread:
I loved it. What a simple baby gift! Here was a charming, cuddly quilt that could be dragged around, soiled in every way imaginable, and repeatedly put through the wash with no worries or second thoughts. Then I went to Cheryl Barnes‘ class, and as she is the founder of Golden Threads, she couldn’t exactly not talk about uses for their flagship product. I personally have had a love/hate relationship with Golden Threads paper; I love that it allows a design to show up on any fabric without marking, and I hate hate HATE removing it! But Cheryl gave some intriguing tips for accomplishing that step with less pain (use a pencil eraser, a shop vac, a lint roller, or one of those Scotch Fur Fighter things) that makes me willing to approach it with less dread and loathing. It occurred to me that the Golden Threads paper would allow me to overlay a traced pantograph design onto an impossible-to-mark fabric like Minkee so I could then follow the lines with my machine, accomplishing the same result with just the additional step of transferring the design to the paper.
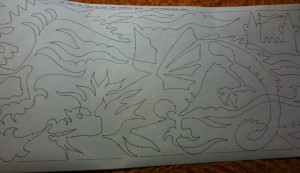 With this idea already lodged in my brain, I then happened upon the booth for MeadowLyon Designs, who make not only pantographs, but a line they call Pictograms, which are non-repeating 11-inch x 12-foot designs. That means you can make a 36″ x 44″ quilt by stacking four 3-foot x 11-inch sections of the design and never having it repeat. As soon as I saw their Dragons Galore design, I was sold! I’ve bought a piece of green variegated Minkee since then, and will hopefully have more news on that project soon. I also visited a neighboring booth, Munnich Design, and bought a simpler (and cheaper!) pantograph design of ladybugs to be able to use on baby gifts for less nerdy, I mean, dragon-focused, families than ours.
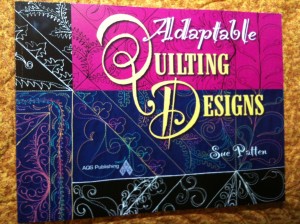 Sue Patten’s new book. “Adaptable Quilting Designs,” which she signed at the Golden Threads booth, contains a lot of the designs she showed in her “Stunning Sashings” class, but with variations. Not only do I want to support Sue as a professional quilter by buying her book, but the book itself is a beautiful thing and has very clear directions on how to stitch the designs.
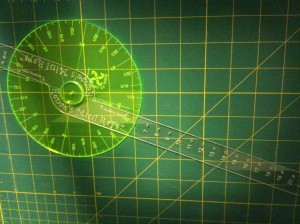 Renae’s Amazing Rays. My biggest purchase, both monetarily and physically, was from Renae Haddadin. I had taken her “Amazing Ways to Use Circles and Rays” class last year, and while I was fascinated by the process, the tools were very expensive: $60 for the mini-ray ruler, $30 for the instructional DVD, $50/set for the arc rulers. Much as I wanted to try the techniques, I didn’t want to make that kind of investment. So I took a year and thought about it. I’d had a good idea for the quilting design on “Taupe Winding Ways,” to use Renae’s style of spirograph-type designs to highlight some of the circles in the overall quilt top. Even though I haven’t finished the quilt top, I decided to buy the mini-ray ruler so that I’ll have it when I need it without having to mail-order it. It’s a very unwieldy piece of equipment; it was even awkward to carry it around for an hour or two until I could take it back to the room, and I had to be very careful with packing it into the car to avoid breaking it. But it is a very well-designed ruler, and I look forward to playing with it. I also bought the DVD, so I’d have the full complement of instructions as well, rather than having to rely solely on my class notes from last year. I was able to forgo the arc rulers, though, because I don’t need the heavy 1/4″ thick acrylic arcs that longarm quilters use to guide the hopping foot; I just need an arc I can trace onto fabric or Golden Threads paper. Quilter’s Rule sells a set of nested circle templates that are available in 1/8″ thickness for half the price of the 1/4″ set, but I’m going to try to use some of the circle rotary cutting templates I already have, such as the Circle A Round cutting ruler, before making additional purchases.
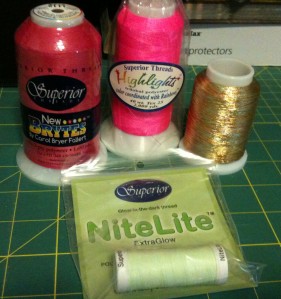 Threads. Of course, I did buy some thread from Superior. In addition to the prewound bobbins that saved the day for me in Patsy Thompson’s class, I also bought a cone of Highlights, a cone of Metallics, a spool of NiteLite, and the cone of New Brytes that I’ve been looking for for months, to use when I quilt “Taupe Winding Ways.” They haven’t been bringing the New Brytes cones to the shows lately, and I hadn’t wanted to pay for shipping. But Bob Purcell offered to have it shipped to the show booth with the rest of the restock order when I asked him about it at the Wednesday night preview, and it was at the booth by Friday morning with a little personalized note for me from the warehouse included in the bag! Once again, the quality of their products is exceeded only by their customer service.
Next post: the quilts!
Gearing up for Quilting with Machines
Turning the calendar page for September always seems to sneak up on me. I’ve been out of school for over a decade now, but the end of summer still carries with it a sigh and a plodding return to a less-fun routine. However, this year it also brings excitement: September is the month I go to Quilting with Machines!
Diane and I are returning attendees this year, having had an overwhelmingly good time at last year’s event. At first, I was disappointed to learn that the organizers were changing the time and the location for 2010, moving it further west and from October to September, but that was before I knew I’d be in my third trimester of pregnancy in fall 2010. Attending a machine quilting conference six-and-a-half hours away from home is much more doable at 32 weeks than at 36, when I’m no longer supposed to be more than an hour’s drive from the hospital. (I’ve been fortunate to have a very healthy and active pregnancy to this point, so I have no reason to expect drastic change in the next two to three weeks, but obviously I will be sensible and cautious.)
Last year, I didn’t really know what to expect. QwM started as a retreat for an Ohio longarm quilting guild and has grown over the years into a learning event for all forms of machine quilting. However, as a domestic machine quilter, I was concerned. Despite what the mission statement said on the website, what if the classes were far too longarm-specific? What if the teachers looked down on domestic machine quilters? What if I was wasting my time and money? Of course, all I wasted was a lot of worry. Although the teachers were all well-known longarm quilters, the designs, techniques, and thought processes they taught were applicable to any type of machine quilting.
I came back from the conference with my mind just buzzing with new techniques to try. As Sue Patten said in her Freemotion Freehand Possibilities lecture, “If you don’t go home and practice what you’ve learned, next year just mail me a check and stay home.” With that in mind, I’m trying to do as much machine quilting as possible leading up to this year’s event so that I am in the best possible mindset to absorb the information. I’ll be recently familiar with my biggest strengths and weaknesses in machine quilting, and thus be primed to learn, and ask when necessary, how best to overcome them.
To that purpose, I’ve been quilting as many tops as possible from my stash that were ready to quilt. This Noah’s Ark panel was a cheapie from JoAnn’s that I specifically bought because I didn’t care about it: I used it to test my idea for the addition of lattice strips for Window on Whimsey last summer, thinking that if it turned out decently, I’d quilt and donate it. Now that we’re having a baby, I’ll use it as a “tummy time” playmat for him.
In the Quilt Guilt corner, I’ve been holding on to my mom’s Halloween Attic Windows wallhanging forever. We took an Attic Windows class together at Smile Spinners probably 6-7 years ago (I know it was before I bought my Janome, and that was July 2004.) She made this absolutely charming wallhanging, using fabric that reminded us both of the Edward Gorey animation from the opening credits of Mystery! on PBS:
When I came across it in her sewing room a couple of years ago, still an unfinished top, I asked if I could quilt it for her. She agreed, saying, “no hurry.” This is not a good phrase to use on a quilting procrastinator like me. I’ve taken it to at least three guild retreats with the good intention of quilting it, to no avail. At least I made the positive step back in February to order a spool of Superior Threads NiteLite Extra Glow glow-in-the-dark thread to use on it, but it’s only since last weekend that I’ve actually made progress.
Once I’ve got the bindings on, and the label and sleeve on my mom’s quilt, I’ll post some detail pictures of the quilting. I did some playful experimenting on both, and am very happy with the results.
The third project is, of course, Matt and Alyssa’s wedding quilt. I’ve started quilting it and I like the virtually no-mark design I’ve chosen, but I’m having weird thread problems and becoming very frustrated. I’m using Superior Threads Bottom Line in a pale blue in both the top and bobbin, and while it is usually one of my favorites, I’ve been getting unexpected skipped stitches and having the thread “catch” on the needle. (To be fair, since I’ve used this particular cone of thread before without incident, this is more likely a machine problem manifesting due to the fineness of this thread, than an actual thread problem.) Following the advice on Superior’s excellent troubleshooting pages, I’ve mitigated these symptoms by adjusting my bobbin tension (eek!) and going up to a #90 titanium topstitch needle (their thread guide suggests a #70 or #80), as well as running the machine much more slowly than I’m used to, which is playing havoc with my stitch length consistency. It’s improving, but problems like this can drain away one’s motivation, and of course with all the ripping and adjusting, it’s taking forever. I’ll post a picture when it’s finished.
All this quilting, with its attendant ups and downs, will hopefully not only prepare me for Quilting with Machines, but also for quilting Ruby Wedding. I haven’t basted it yet (it’s 90″ square, thus presenting some logistical challenges) but I’ve pieced the back and made the binding, so I’m getting there. I think I’ve even made most of the design decisions for it. At this point, it’s really just a question of confidence: I’m so happy with how the top turned out that I want to make sure my quilting enhances, rather than detracts from, the beauty of the top. Hopefully all this intensive quilting will help build that confidence, because there’s nothing to it but to do it.
For All the Quilters Living with Cats
This is Fergus. He just taught me something I did not know about quilt fabric.
And no, he can NOT has cheezburger.
I chose this picture because it illustrates two traits of Fergus’ character that are extremely pertinent to this story: he has a voracious appetite, especially for people food that he’s not permitted to have, and he has no sense of consequences. See, like most domestic cats (really, like most adult mammals that aren’t us) Fergus cannot properly digest dairy products. He loves the taste of them, but they make him sick. However, since the act of becoming sick comes hours after the eating of the tasty cheese, or licking out the cereal bowl, or the yogurt carton, or what-have-you, his tiny brain doesn’t link the two events. And then there’s a mess for me to clean up. Fergus has the additional endearing trait of possessing a knack for finding the absolute highest point from which to then vomit, so he gets to target as many surfaces on as many levels as possible. I’d need Dexter Morgan to track the spatter patterns sometimes. (This is why my husband and I have had so many “talks” about the necessity to rinse out one’s cereal bowl.)
Of course, at some point while I still had the mini-retreat setup in my dining room, including a nice little pile of fabric for Matt and Alyssa’s quilt stacked up on the end of the hutch/cutting table, Fergus climbed up on the adjacent armoire and let his stomach contents fly from six feet up. Gross, but not a huge problem; after all, one of the many lovable things about fabric is that it’s washable. I threw the offending fabric in the washing machine (thank goodness I am a convert to prewashing my fabric in recent years, especially for gifts, but that’s a tale of woe for another day) and it emerged none the worse for disgusting wear — or so I thought. When I went to re-press the individual pieces, I found one exception:
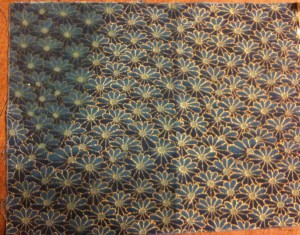
See how the gold etching has vanished from the design in the upper left corner? It follows the contour of the stain, except there's no stain -- just no gold there!
I love metallic fabrics, white-on-whites, Fairy Frosts, and many other variations on applying a surface “paint” to a printed fabric. And while Dierdre McElroy does warn in her lectures and on her “The Perfect Stitch” DVD that they can wear off, and therefore might not be the best choice for an heirloom quilt, I tended to think of that as a decades-long process, not an immediate concern. Yet apparently, a relatively short period of contact with a cat’s used food is enough to strip that surface treatment right off.
My takeaway lesson from this experience is that not only is a “painted” fabric a poor choice for an heirloom quilt, but it is also a potentially poor choice for a baby quilt. After all, babies spit up at least as often as cats, and while they may not produce as much stomach acid, I would imagine the effects could be similar. It would be interesting to approach this as an actual scientific experiment, using an acid solution comparable to human stomach acid, and comparing the results to repeated washing in regular laundry conditions to see how long standard use takes to remove those surface finishes. (Science Fair project, anyone?) I know I’ve washed many quilts containing metallic fabrics numerous times without seeing any visible degradation, which is why I was so shocked to see just how dramatic the Fergus Effect truly was.
So thank you, Fergus. Without your unfortunate digestive issues, the body of quilt fabric knowledge would be poorer.
(He really is a very sweet cat, whose affectionate nature more than compensates for the occasional vomit issue.)
Whoo Hoo!
It had to happen sooner or later:
This is my first completed UFO since I started this project. I’ve been making gradual progress on several others, so hopefully this summer will be an extremely productive time as far as finishing a whole bunch of quilts all at once. Instead, lately I’ve been tackling some pretty ambitious projects with an eye toward the quilt show in June rather than working on the easy ones.
Speaking of the easy ones: I had categorized Windows on Whimsy as being the WIP closest to completion, which considering it was already layered, basted, and had the quilting started, wasn’t entirely crazy. HOWEVER. I chose a no-mark, but very dense and ambitious, quilting design for that quilt. As such, I spent two whole days of the December retreat, and a day and a half of the April retreat this past weekend, machine quilting this quilt. AND I’M STILL NOT DONE!!! To be fair, I’ve made a lot of progress; the only area left to be quilted is the panel section, and I’ve already ditch quilted that and done one windowpane with the clamshell design I’ve selected. I would have done more at the retreat, but the white iron-off pounce powder I brought with me to mark the stencil design didn’t show up as well as I had hoped. I don’t want to have to use Golden Threads paper, as I hate with a fiery passion having to tear that stuff away, but if that’s the only thing that will get this quilt finished, I’ll manage. Heck, if walking barefoot across hot coals gets this quilt finished, I’m (probably) game. I finished sewing the binding on it this evening, so I can see another quilt-finishing celebration on the horizon.
But back to the one I already finished: I brought Convergence Birds to the retreat and started working on it right away, starting about lunchtime on Friday. It was spray-basted and I had ditch quilted the convergence section and along the satin stitched applique bird border, but that was as far as I had gotten when my machine started acting up. I had also made the binding. This time, with my newly serviced machine, the free motion quilting went extremely well.
The only problem I encountered was that I hadn’t spray-basted the edges of the quilt top as thoroughly as I might have, so every now and then a fabric edge would catch on the darning foot and create a pleat that I’d have to rip out, but I could deal with that. I really liked quilting the wool batting; I will definitely be using it for Ruby Wedding. The fact that I’d had so much time to consider my options for quilting design and thread choice due to all my unanticipated delays meant that I was extremely confident in my final choices, and that combination of confidence and uninterrupted quilting time made the completion of this quilt a thoroughly enjoyable experience. I love retreat!
Someone at retreat mentioned that next time, we should bring a bell to ring every time someone finishes a project. We had a full house this time, so even though each quilter tended to announce her successes, not everyone heard. And although a bell would be nice, the happy dance in my head tends to sound a little more rockin’:
Yes, that is actually what plays in my head when I finish a quilt. I even wore this shirt for the occasion:
The Featherweight And I
Even factoring in all the choir-singing we did for Easter and taking a trip out of state to see our nephew get baptized this past weekend, I’ve managed to put in a reasonable amount of studio time in the last couple of weeks. Which, of course, meant I was limited to activities that didn’t require the use of my workhorse Janome, since it’s been on the DL.
I managed to resist the urge to start anything new; after all, that kind of defeats the purpose of this whole project. Instead, I made what progress I could on the WIPs, such as making the binding for Convergence Birds:
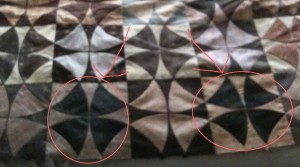
But primarily, I’ve been assembling Taupe Winding Ways. While that fits the bill of only requiring straight stitching, it has required an upsetting amount of UNstitching. Here’s the situation: I don’t know exactly how many fabrics are represented in those blocks, but there are MANY. So many, in fact, that one would think I wouldn’t have problems duplicating fabrics close together in a quilt top that contains 255 blocks. One would think that, even if I put the blocks together randomly, it would be highly unlikely that the same fabric would appear two blocks away from itself. And yet:
I have been very careful and deliberate in placing blocks, which is increasingly difficult as the quilt top gets bigger and bigger. Yet I keep finding places in which I have inadvertently put the same fabric (or the same print in a different colorway, or a separate fabric that looks way too much like the first one) nearly on top of itself.
As I explained when discussing this problem at a quilt show committee meeting last week, I can’t just let it go. I’ve been working on this quilt for so many years that when it’s finally finished, I want to be able to look at it and feel nothing but happiness. I don’t want to look at it and say, “Yeah, I should have ripped that out and moved it, but I convinced myself it didn’t matter.” I know myself well enough to know that once I’ve found an error, I become laser-focused on it until it’s rectified. It’s not a pleasant way to be, but it’s who I am.
Despite the two steps forward, one step back character of my progress, I do have something to show for my time. I have 5/8 of the bottom half of the quilt top, minus the border, sewn together (albeit in three separate pieces for ease of handling.) Since it’s so huge, I don’t have a design wall big enough to display the whole thing at once, which further complicates the attempt not to duplicate fabrics; I end up running back and forth between the upstairs hall and our bedroom, even trying to take pictures with my phone to make sure. Yet I still keep periodically pulling out the seam ripper. So is life. At least I’ve taken the time to seek out and try enough seam rippers that I’ve found my favorite:
But I got a phone call Saturday that my Janome is ready, so we’ll be up and quilting again soon! It’s been nice working on the Featherweight, with its beautiful stitch and its friendly little clackety-clack noise; I haven’t even burned myself that badly on the inconveniently placed light bulb this time out. However, ever since I typed the title for this post, I’ve had an earworm. And not just any earworm, but a Broadway earworm, which in my experience are the most persistent. Just like in “The Ring,” the only way to save myself is to expose someone else, so here you go:


